


Fireplace Resurfacing
Fireplace resurfacing, fireplace refacing—whichever process you choose to call it, the process is calling you! The ancient brick surface of your hearth has seen better days, a lot of them, and you’re now in the market for a quick fix that won’t look like a rush job. Obviously, you could hire a contractor, throw several thousand dollars onto the fire and have brand new brick installed, but why?
The reality is that the vast majority older brick fireplaces, while they may be stained with tar and soot, are still as sturdy as the day they were built. Brick is a high-quality building material—and new brick doesn’t come cheap. So why throw such a valuable investment out while you’re sweeping out the ashes? An easier, cheaper and, yes, quicker option is to renew your fireplace’s appearance with brick fireplace paint. Available in an easy-to-use kit, complete with the necessary tools for a weekend DIY project, plus clear instructions for proper application, this is the answer to your fireplace’s exterior problems, however you describe them.
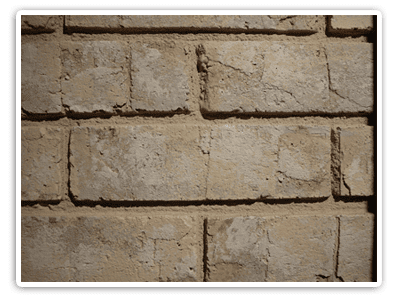 Older brick fireplaces often look as though they are on their last legs. Maybe the bricks are stained with tar and soot but, functionally, the fireplace is as sturdy as the first time a fire was built inside it. The bricks are solid and the draw is good. It’s just plain scary looking. Brick is a high-quality building material and doesn’t come cheap. New brick and laying it is expensive. If you hire a contractor to replace those bricks, you are likely throwing several thousand dollars at the problem. If you’re thinking of new sheetrock or a new fireplace surround, that can also be expensive and not give you the look you desire. You want a permanent solution and not a job that looks rushed. The solution for this problem may very well be brick fireplace resurfacing or refacing. An easier, cheaper and quicker option is to renew the fireplace’s appearance with brick fireplace paint and resurface the existing brick.
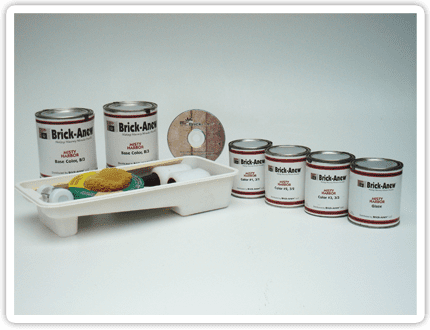
All the materials needed to do this job are available in an easy-to-use kit which is sent to you with free shipping. The package comes complete with the necessary tools for a weekend do-it-yourself project. Yes, it can be done in a single weekend. Clear instructions for proper application are included. This really is usually the best answer to your fireplace’s exterior problems. The finished product has a textured sandstone look available in several colors.Even if your fireplace bricks were previously painted, this solution still works and with likely much better results than the previous job. Any flakes of paint can be brushed off before the resurfacing kit materials are applied.
Everything you need to do this transformation from ugly to gorgeous comes bundled in a single package. Every fireplace resurfacing kit contains: two containers of base coat/sealer, three undertone paint colors and sufficient glaze to cover approximately 100 square feet of fireplace brick. If your brick is rough or porous, one or two extra containers of base coat/sealer may be needed. Applying the undertone colors is done using the included tools. The process is easy and your brick will look just like new. That look is similar to a more expensive marble or tumbled stone. To choose the perfect look for your home, visit the fireplace paint colors page to find the right shade for your decor.
You get five shades of latex paint specially formulated for use on fireplace brick. All the tools you need to complete the project – a paint tray, rubber glove, brushes, rollers, sponge, paint tape, and stir stick are included. A step-by-step video on DVD, as well as written instructions, shows you exactly what to do. The only prep work necessary is to brush off your brick to remove any loose mortar or dirt. First, you paint a base coat over all your brick and mortar. Then you follow up using either your small roller or sponge to apply three “undertone” colors and a glaze. There’s nothing difficult or tricky about the process. Just follow the steps in order and get great results.
To summarize how easy it is to transform your fireplace:
-
- Step 1– Remove all accessories and clean the brick
- Step 2 – After taping off the fireplace, brush on the base coat/sealer over all the brick and mortar like you’re painting a wall.
- Steps 3 – 6 – Apply colors 1, glaze, 2, and 3 allowing the paint to dry between each step.
- Step 7 – Apply the clear matte finish after allowing the paint to dry completely.
-
- The result of this brick fireplace resurfacing is that the refaced brick actually looks like real brick and not brick that have been painted over. If you purchased new brick, every brick wouldn’t look the same and every brick wouldn’t be one solid color. That’s the look you get when you apply the shades of paint according to the directions in the kit. Our professional decorators have designed the perfect colors to give your fireplace a real brick look.
Room Interior Design and Fireplace Paint Colors
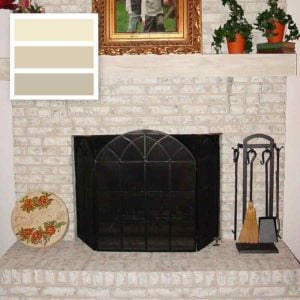
- If you have tan, taupe, beige or medium-colored tones in your room, choose Twilight Taupe. It looks like a natural sandstone or tumbled marble and can blend in easily with many color schemes. It’s a beautiful combination of taupe, tan, beige and cream. Twilight Taupe is the most popular color since it blends in easily with a wide variety of home decors. With a lighter color, such as pale yellow, in your room, go with the Frosted Sunshine. The light tan basecoat and subtle yellowish-cream undertones give it a soft, natural look. A little lighter than the Twilight Taupe, Frosted Sunshine is a combination of tan, gray and yellowish cream. If you have gray carpet or your furniture is a shade of gray, choose the Misty Harbor. Misty Harbor is a light and medium gray combination with cream highlights that works particularly well in contemporary rooms that have black leather furniture with chrome and glass accent tables.